> ## Documentation Index
> Fetch the complete documentation index at: https://docs.wolfia.com/llms.txt
> Use this file to discover all available pages before exploring further.
# Confluence Service Account Integration with OAuth 2.0
> Connect Wolfia to Confluence Cloud with a dedicated service account and OAuth 2.0: centralized credentials, audit-friendly access, and user-change continuity.
The Service Account integration is the recommended approach for organizations that require centralized credential management, consistent access controls, and integration continuity independent of individual user accounts.
## Overview
The Confluence Service Account integration allows Wolfia to sync knowledge base articles, documentation, and team content from your Confluence instance using a dedicated service account with OAuth 2.0 authentication. This approach provides better security isolation and ensures the integration remains operational regardless of individual user changes.
## What we sync
* **Confluence pages** - Documentation, articles, and content from enabled spaces (read-only)
* **Blog posts** - Blog post content from enabled spaces (read-only)
* **Databases** - Confluence database content from enabled spaces (read-only)
* **Whiteboards** - Whiteboard content from enabled spaces (read-only)
* **Attachments** - Files and documents attached to Confluence pages (read-only)
## Prerequisites
Before setting up the integration, you'll need:
* Organization admin access to Atlassian Admin (admin.atlassian.com)
* Ability to create and manage service accounts
* Access to create OAuth 2.0 credentials for service accounts
## Setup instructions
### Step 1: Create a service account in Atlassian
First, we'll create a dedicated service account for the Wolfia integration.
1. Navigate to [Atlassian Admin](https://admin.atlassian.com) and select your organization
2. Go to **Directory** → **Service accounts**
3. Click **Create a service account**
4. Enter a name for the service account (e.g., `wolfia-confluence-integration`)
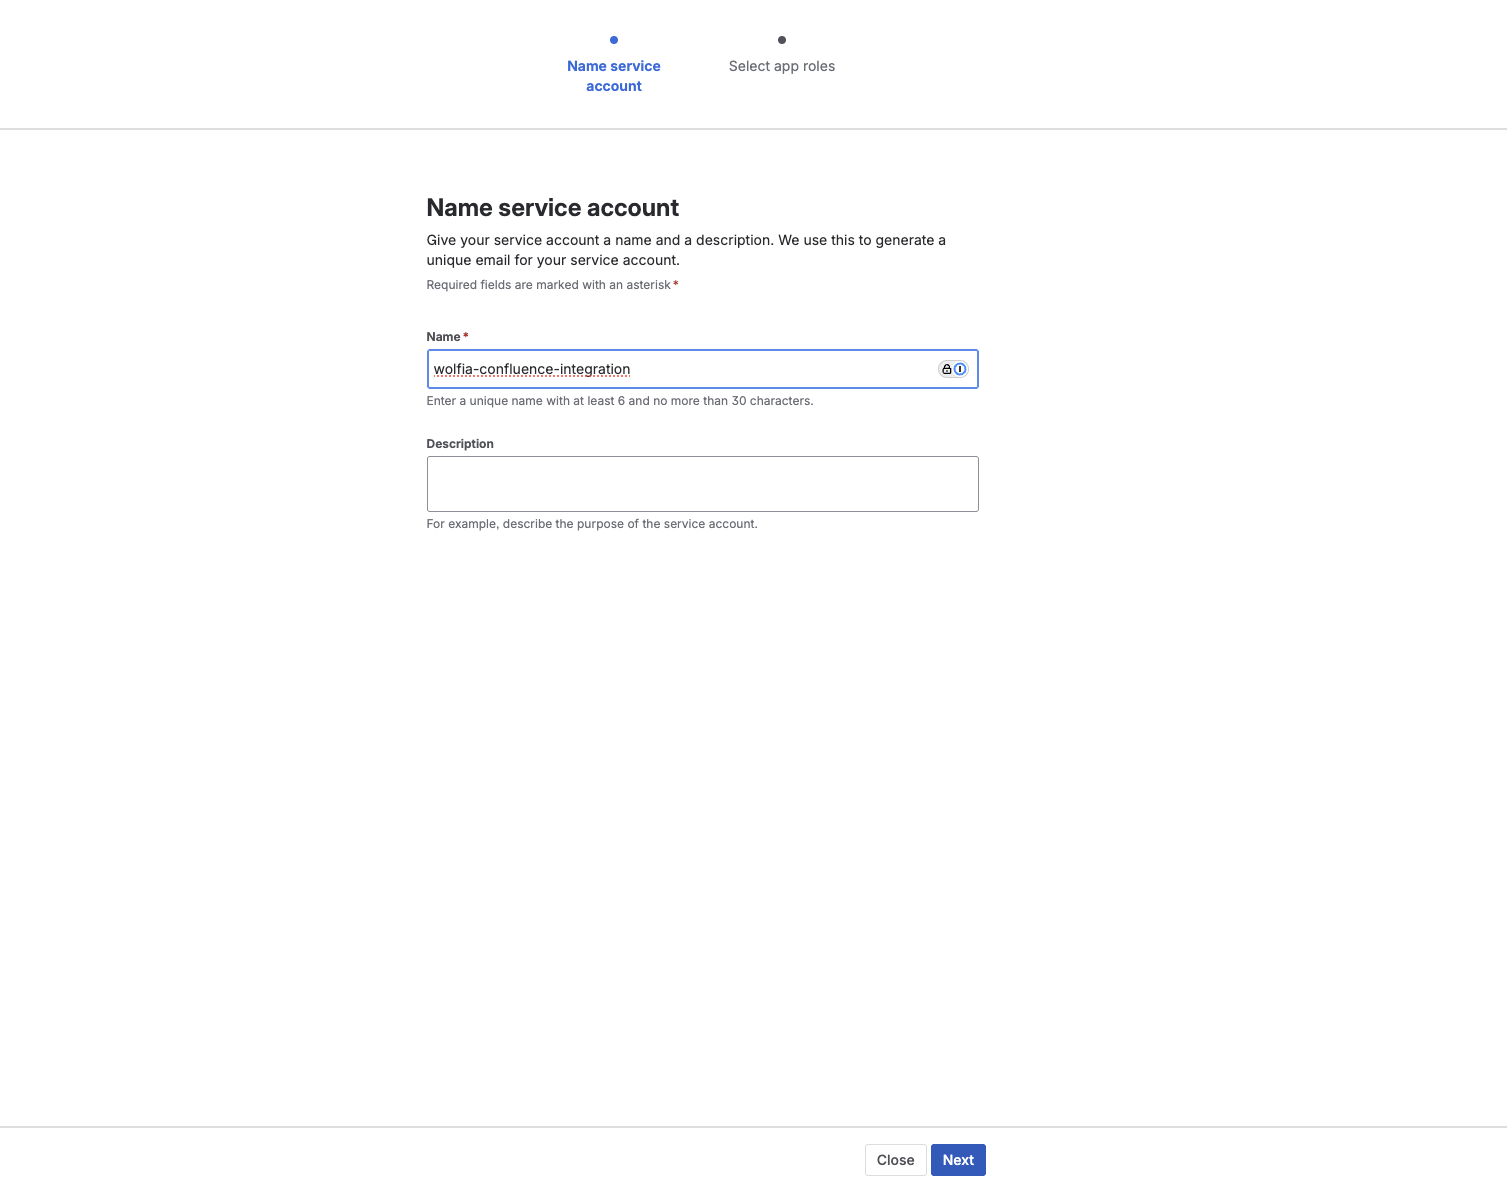 5. Click **Next** to proceed to app role selection
### Step 2: Configure app access and roles
Grant the service account access to Confluence with appropriate permissions.
1. In the **Select app role** step, find **Confluence** in the list
2. Click the **Roles** dropdown for Confluence and select **User**
* **User** role provides read access to Confluence content without admin permissions
5. Click **Next** to proceed to app role selection
### Step 2: Configure app access and roles
Grant the service account access to Confluence with appropriate permissions.
1. In the **Select app role** step, find **Confluence** in the list
2. Click the **Roles** dropdown for Confluence and select **User**
* **User** role provides read access to Confluence content without admin permissions
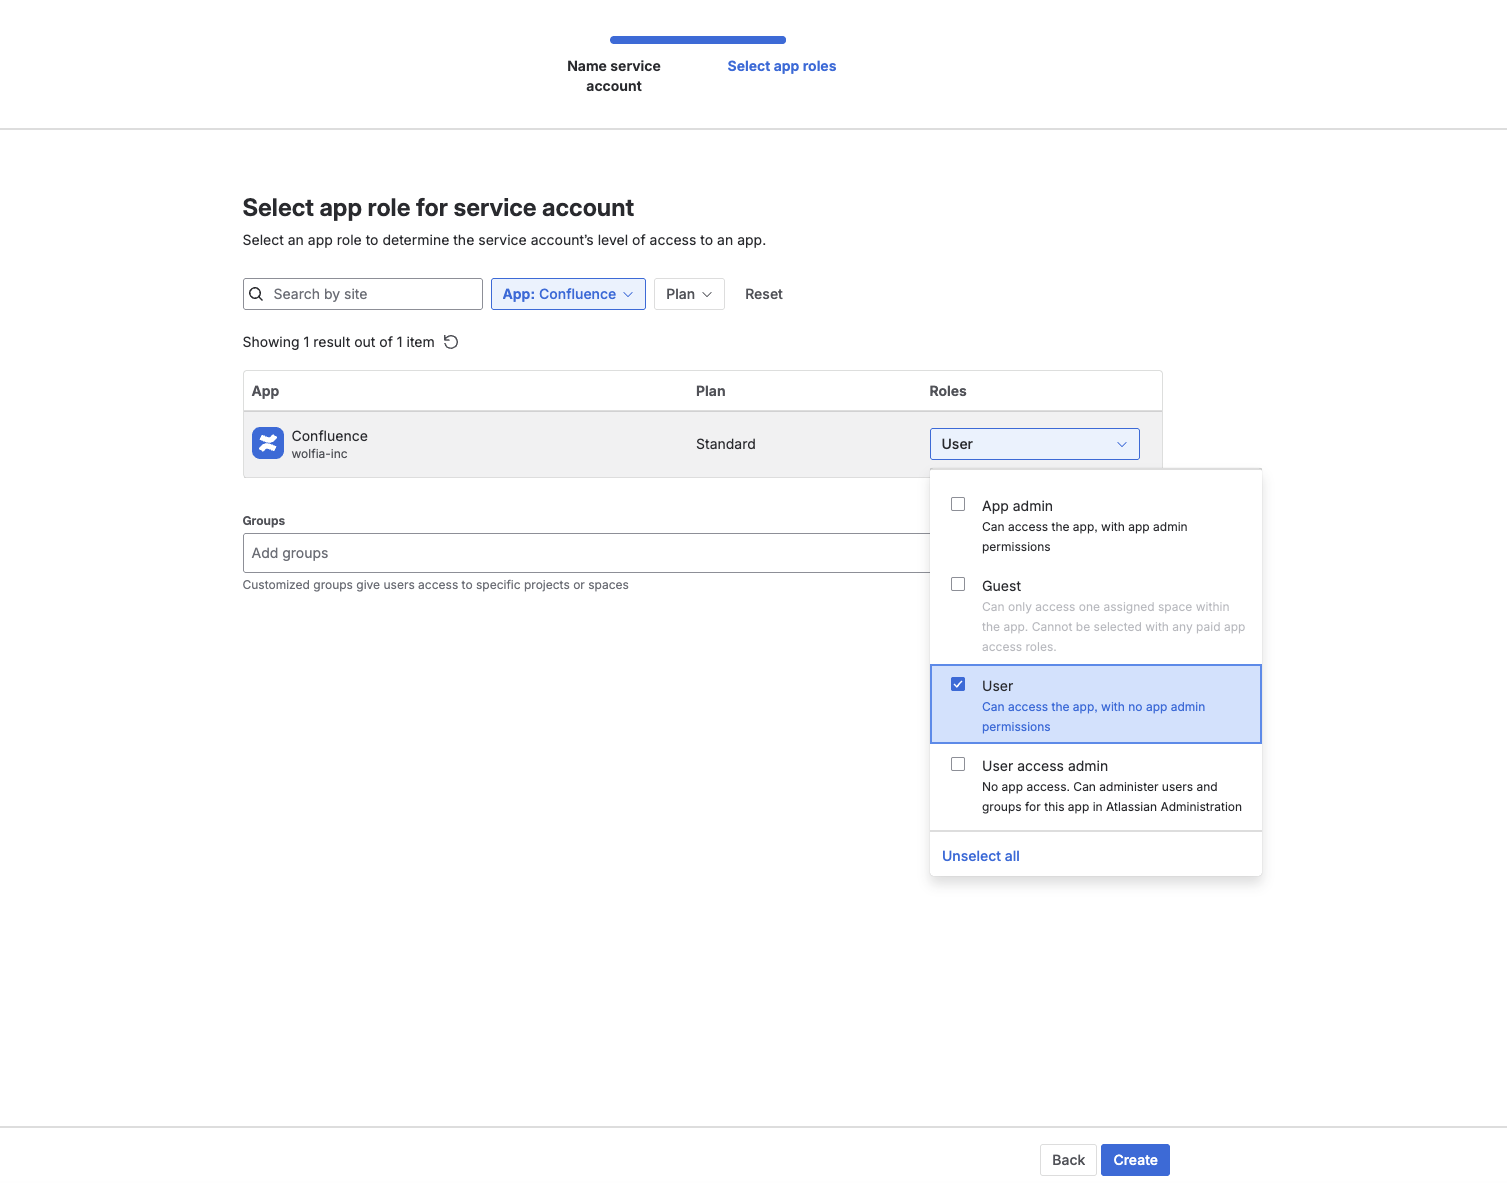 3. (Optional) Under **Groups**, you can add the service account to specific Confluence groups to control which spaces it can access
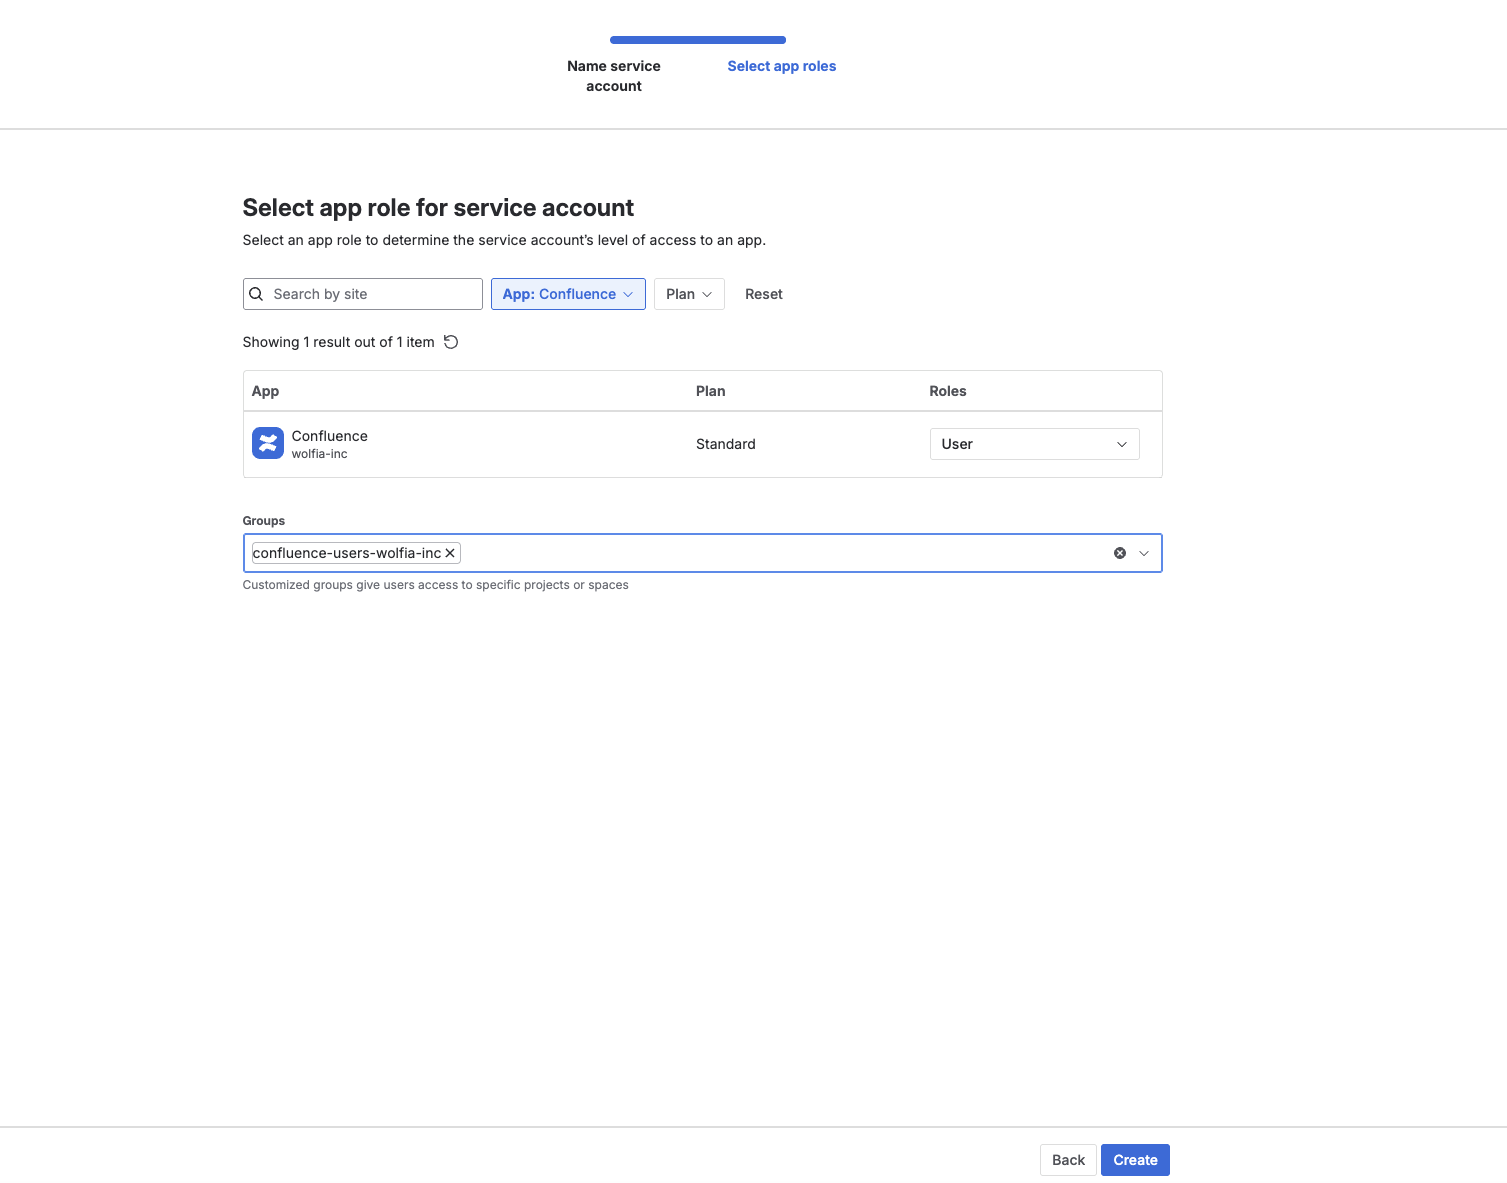 4. Click **Create** to create the service account
Service accounts are organization-level entities that exist independently of user accounts. They provide a stable identity for integrations that won't be affected by employee departures or role changes.
### Step 3: Create OAuth 2.0 credentials
Now we'll create OAuth 2.0 credentials that Wolfia will use to authenticate.
1. After creation, you'll be taken to the service account details page
2. Click **Create credentials**
4. Click **Create** to create the service account
Service accounts are organization-level entities that exist independently of user accounts. They provide a stable identity for integrations that won't be affected by employee departures or role changes.
### Step 3: Create OAuth 2.0 credentials
Now we'll create OAuth 2.0 credentials that Wolfia will use to authenticate.
1. After creation, you'll be taken to the service account details page
2. Click **Create credentials**
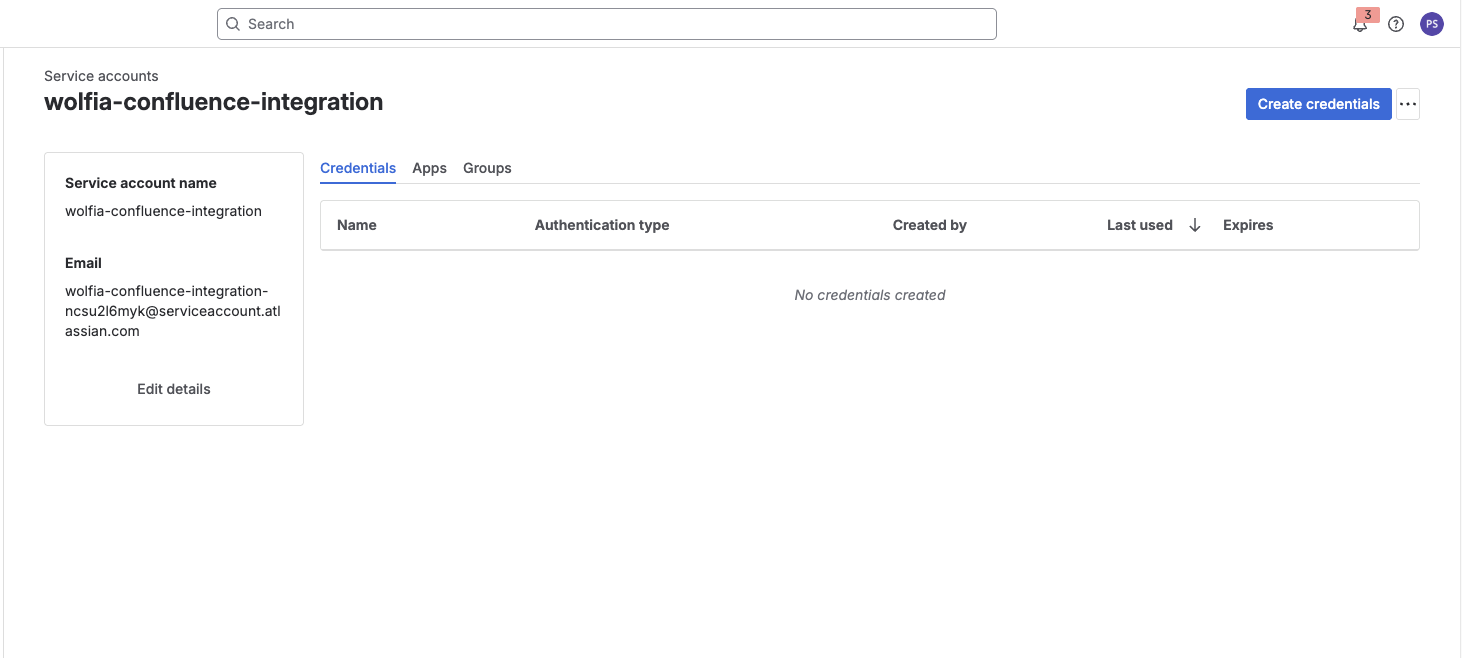 3. Select **OAuth 2.0** as the authentication type (recommended)
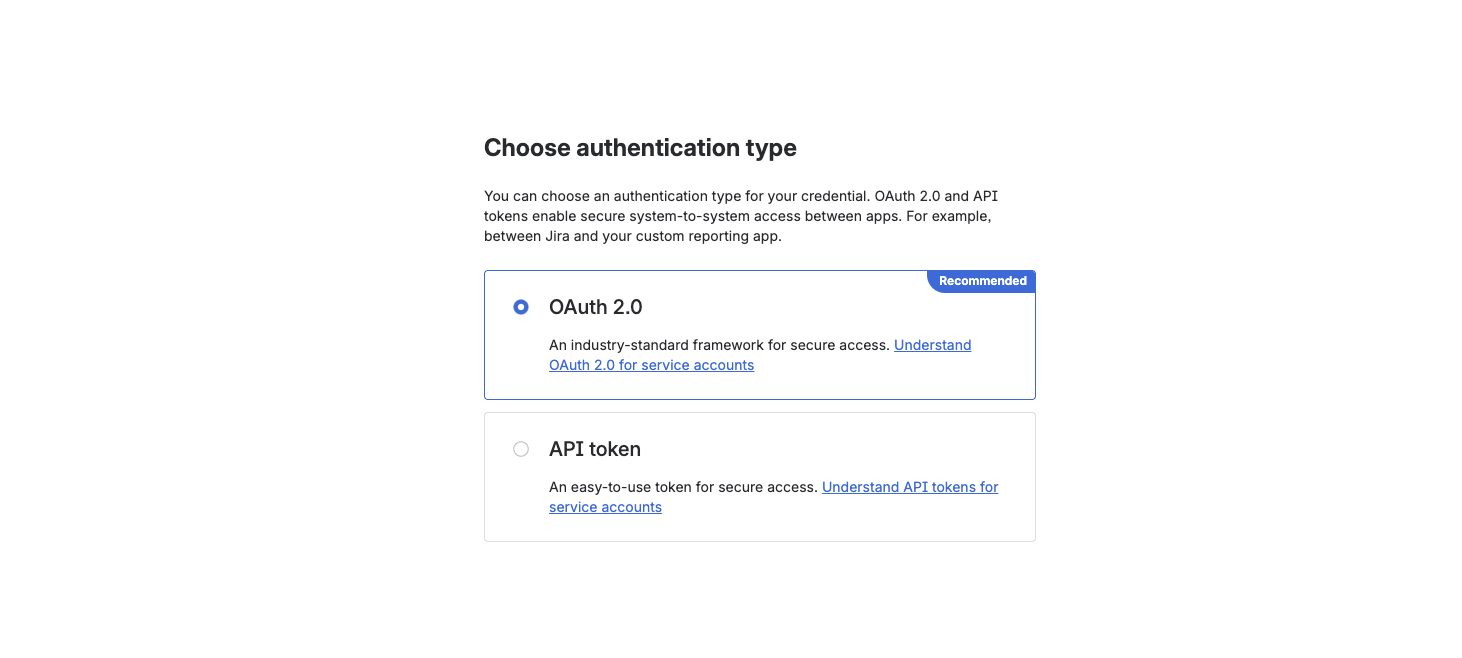 4. Enter a name for the OAuth credentials (e.g., `wolfia-oauth2`)
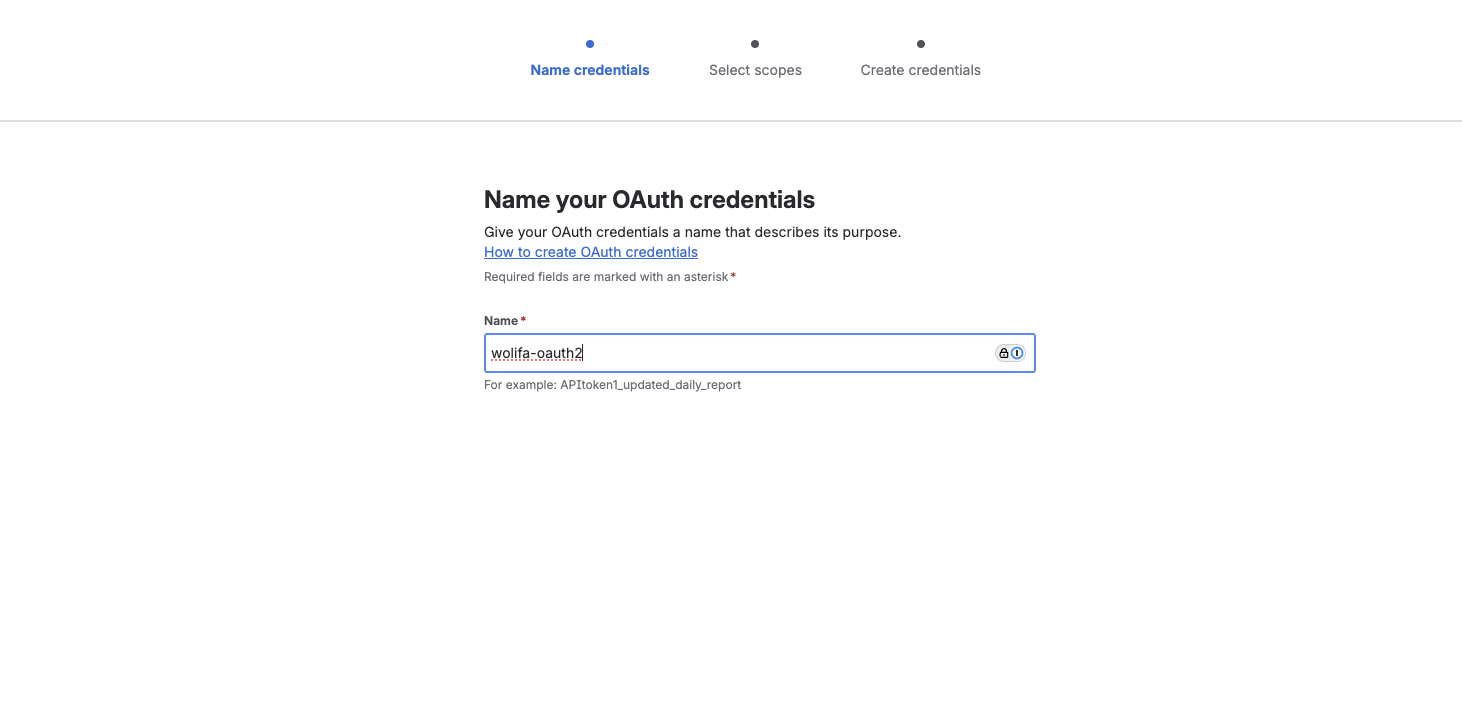 5. Click **Next** to proceed to scope selection
### Step 4: Configure OAuth 2.0 scopes
Assign the required granular scopes for Confluence read access.
1. In the **Select scopes** step, filter by:
* **App**: Confluence
* **Scope type**: Granular
* **Scope actions**: Read
5. Click **Next** to proceed to scope selection
### Step 4: Configure OAuth 2.0 scopes
Assign the required granular scopes for Confluence read access.
1. In the **Select scopes** step, filter by:
* **App**: Confluence
* **Scope type**: Granular
* **Scope actions**: Read
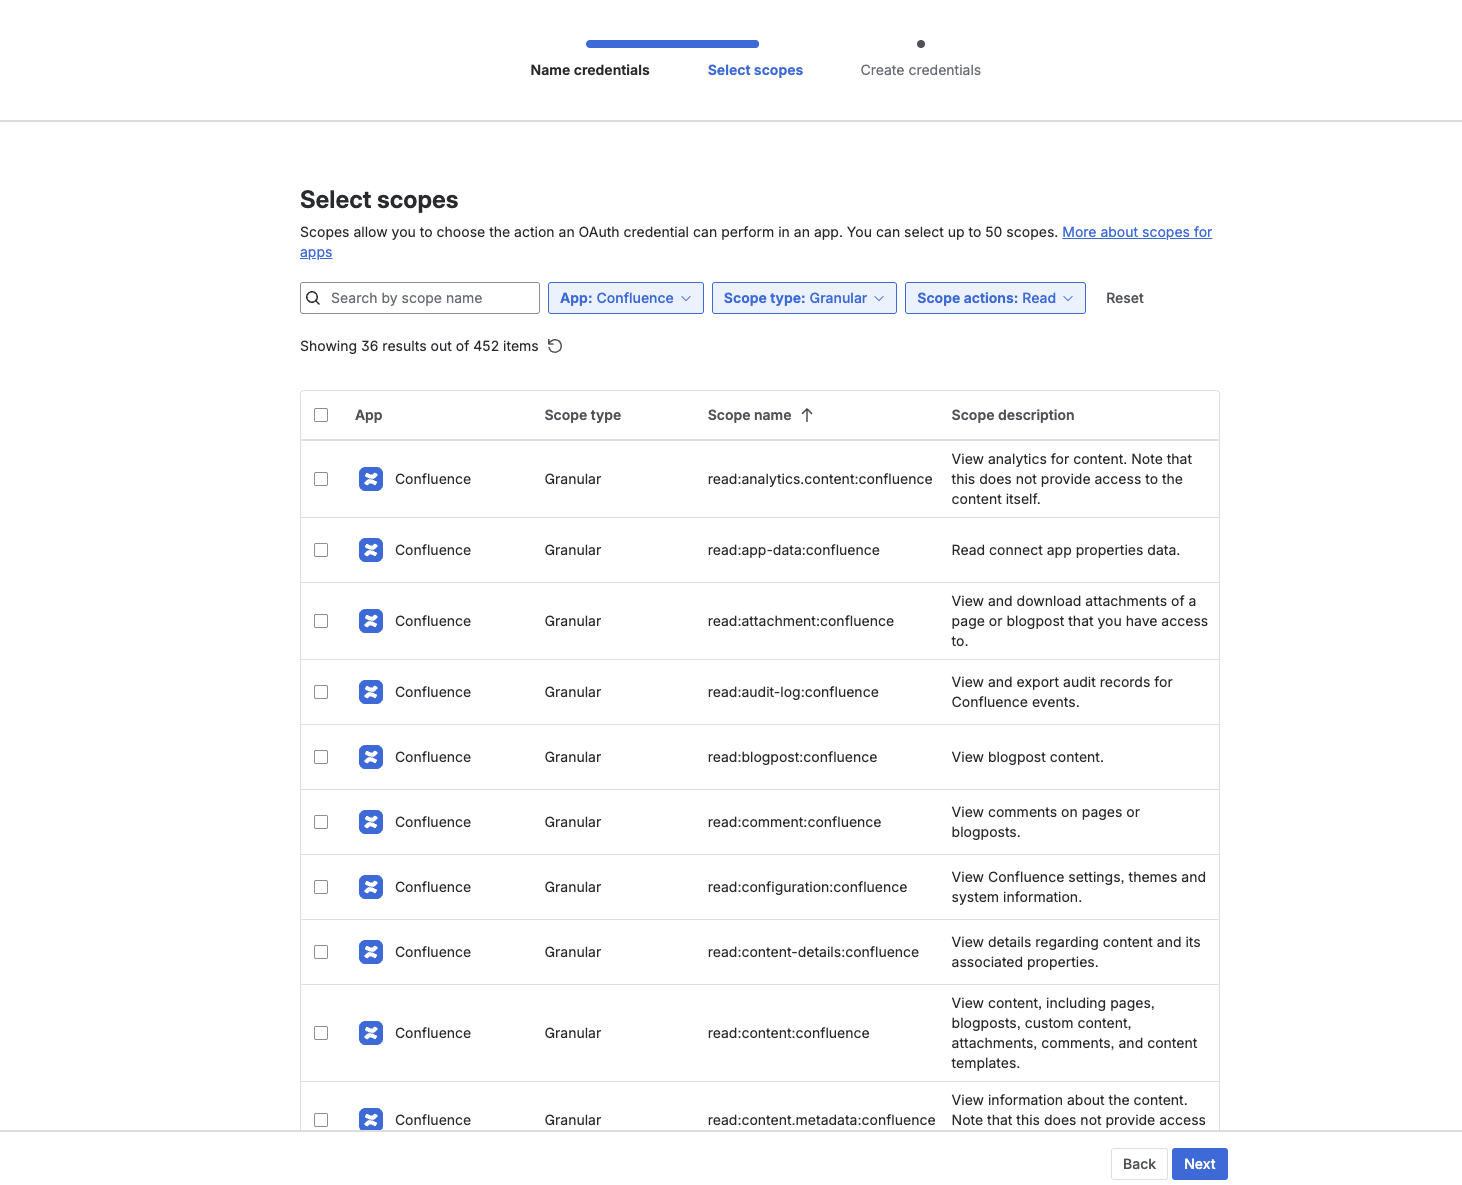 2. Select the following **granular scopes** for Confluence:
```
read:attachment:confluence
read:blogpost:confluence
read:comment:confluence
read:content-details:confluence
read:content:confluence
read:database:confluence
read:folder:confluence
read:label:confluence
read:page:confluence
read:space:confluence
read:template:confluence
read:user:confluence
read:whiteboard:confluence
read:embed:confluence
```
3. Click **Next** to review your configuration
4. Review the OAuth credential name and selected scopes
2. Select the following **granular scopes** for Confluence:
```
read:attachment:confluence
read:blogpost:confluence
read:comment:confluence
read:content-details:confluence
read:content:confluence
read:database:confluence
read:folder:confluence
read:label:confluence
read:page:confluence
read:space:confluence
read:template:confluence
read:user:confluence
read:whiteboard:confluence
read:embed:confluence
```
3. Click **Next** to review your configuration
4. Review the OAuth credential name and selected scopes
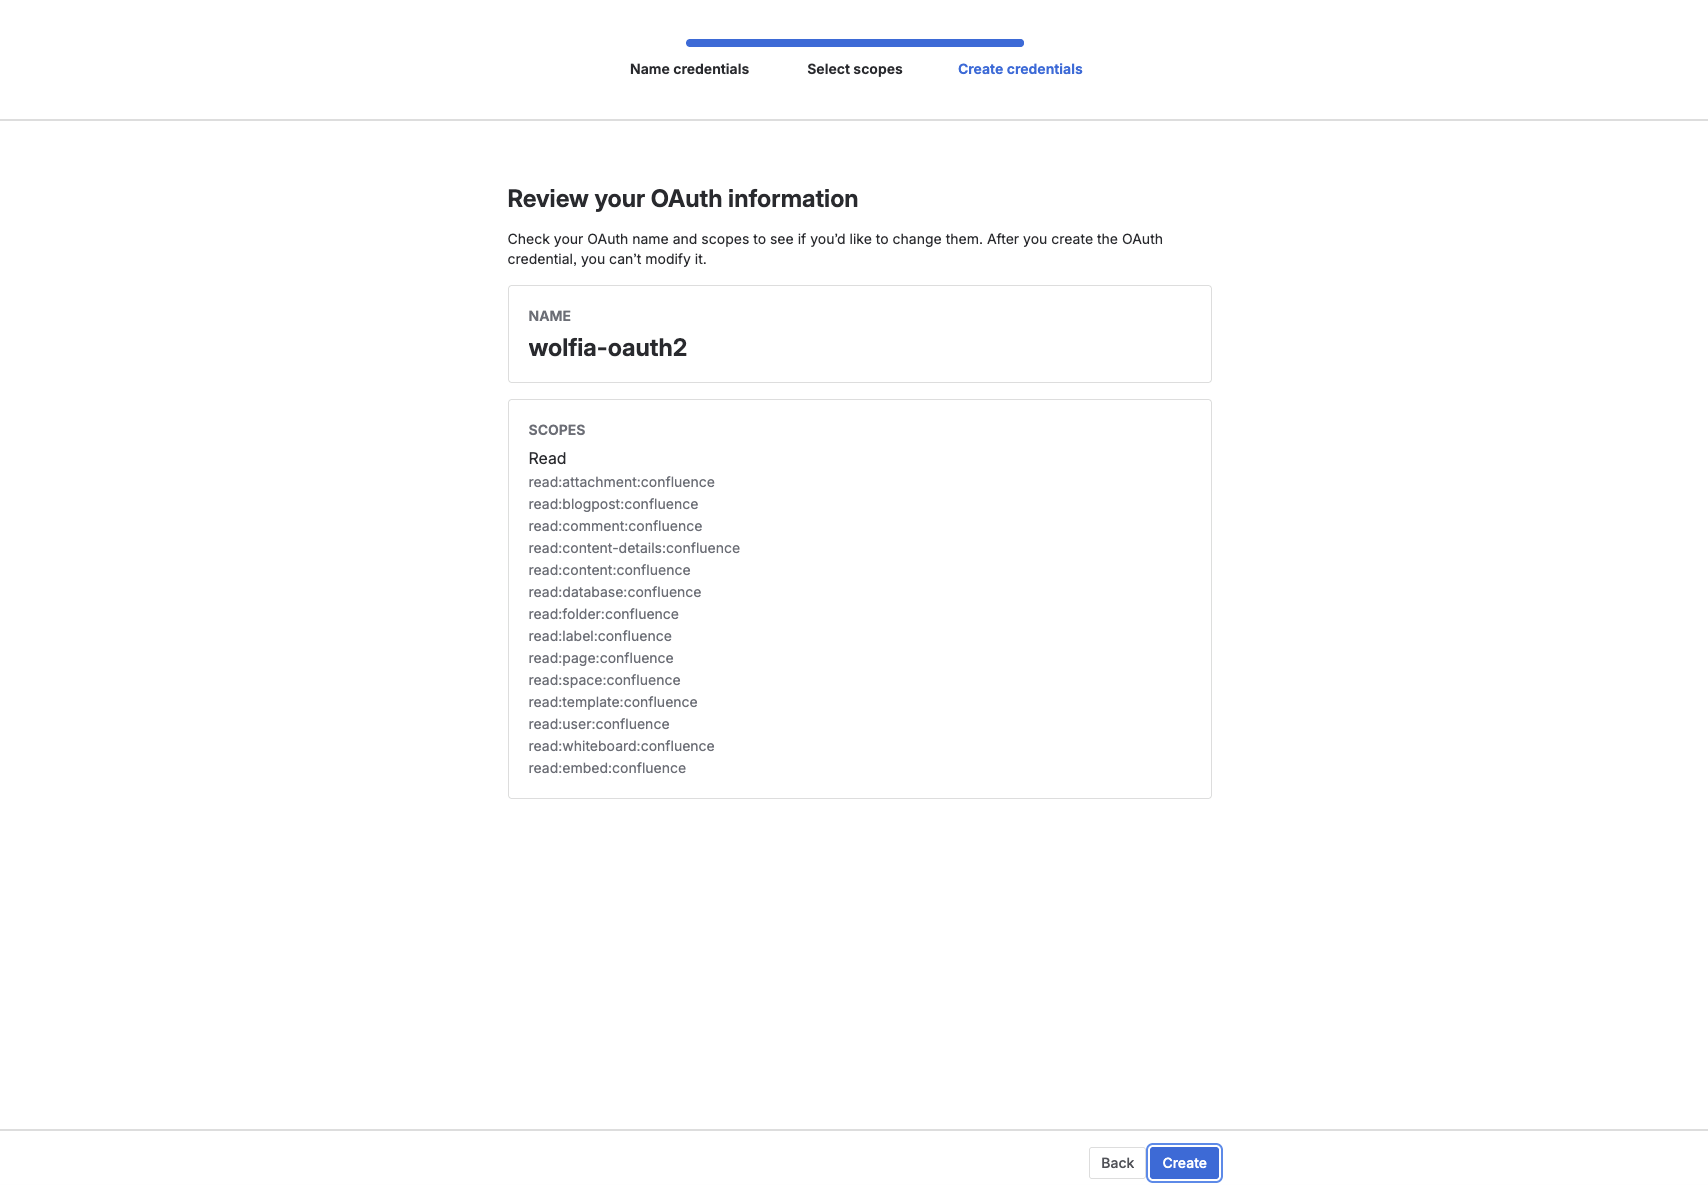 5. Click **Create** to generate the credentials
6. **Important**: Copy and securely store the **Client ID** and **Client Secret** that are displayed
5. Click **Create** to generate the credentials
6. **Important**: Copy and securely store the **Client ID** and **Client Secret** that are displayed
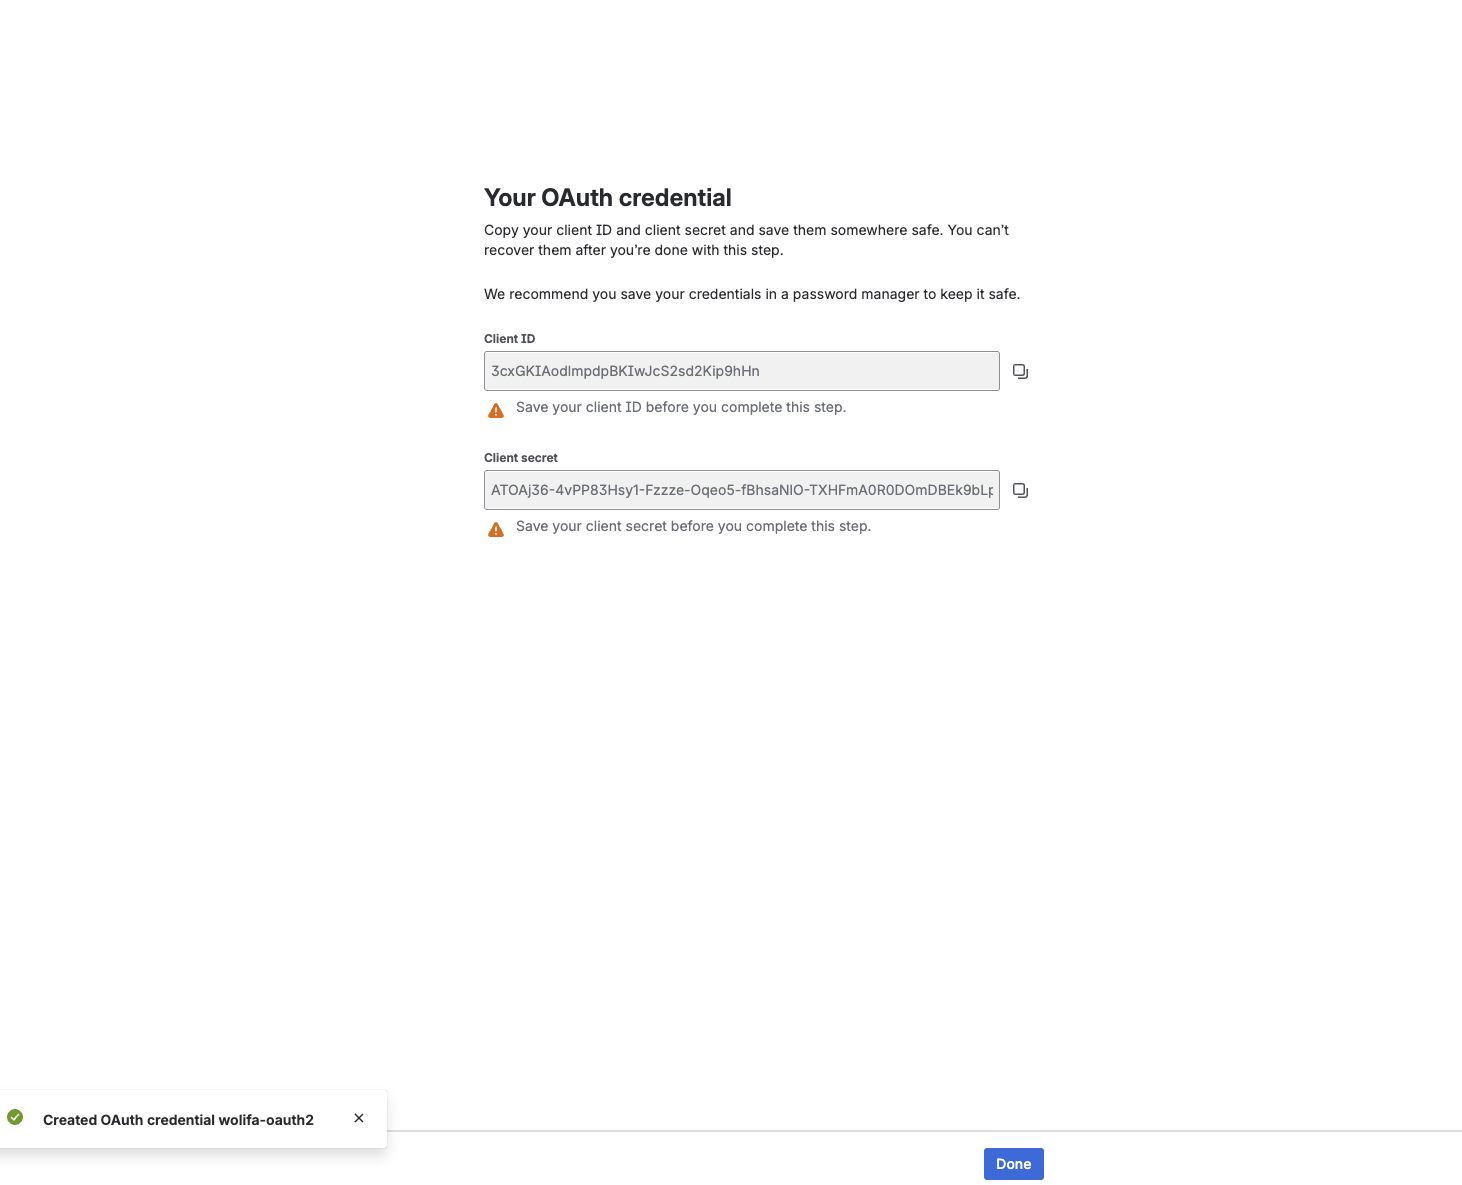 The Client Secret is only shown once during creation. Make sure to copy it immediately and store it securely. If you lose it, you'll need to create new credentials.
These scopes provide read-only access to Confluence content. Wolfia does not require write permissions to sync your knowledge base.
### Step 5: Connect to Wolfia
Now we'll configure the integration in Wolfia using your OAuth 2.0 credentials.
1. Log in to your Wolfia account at [https://wolfia.com](https://wolfia.com)
2. Navigate to **Integrations** from the main menu or go directly to [https://wolfia.com/integrations](https://wolfia.com/integrations)
3. In the **Available Integrations** section, find the **Knowledge** category
4. Locate **Confluence (Service Account)** and click **Connect**
5. Enter your OAuth 2.0 credentials:
* **Client ID**: The Client ID from Step 4
* **Client Secret**: The Client Secret from Step 4
* **Atlassian Organization URL**: Your Atlassian URL (e.g., `yourcompany.atlassian.net`)
6. Click **Connect** to authenticate
7. Wolfia will verify the credentials and establish the connection
### Step 6: Select spaces to sync
Choose which Confluence spaces to include in your Wolfia knowledge base.
1. After successful connection, you'll see a list of available Confluence spaces
2. **Toggle spaces**: Enable or disable specific spaces for syncing
* **Enabled spaces** will have their content synced and made available to Wolfia
* **Disabled spaces** will be excluded from syncing
3. Click **Save** to apply your space selection
4. Initial sync will begin automatically for enabled spaces
## What happens after setup
Once configured, Wolfia will:
* **Import existing content** - Sync pages, blog posts, and attachments from enabled Confluence spaces
* **Continuous monitoring** - Automatically detect and sync new or updated content
* **Knowledge enrichment** - Use Confluence content to provide better responses to questionnaires and RFPs
* **Search integration** - Make Confluence content searchable within Wolfia's knowledge base
## Managing the integration
### Viewing sync status
Monitor the health and activity of your Confluence integration:
1. Navigate to **Integrations → Confluence (Service Account)**
2. View integration dashboard showing:
* **Connection status** - Active, paused, or error state
* **Enabled spaces** - Number of spaces currently being synced
* **Last sync time** - When content was last updated
* **Content statistics** - Number of pages and attachments synced
### Adding or removing spaces
Modify which spaces are included in your knowledge base:
1. Go to **Integrations → Confluence (Service Account) → Manage**
2. Toggle spaces on or off as needed
3. Changes take effect immediately and trigger a sync update
### Disconnecting the integration
Remove the integration entirely:
1. Go to **Integrations → Confluence (Service Account)**
2. Click **Disconnect**
3. Confirm the disconnection
4. Optionally, delete the service account in Atlassian Admin if no longer needed
## Security considerations
* **Read-only access** - The integration only requests read permissions; no write access to your Confluence content
* **Service account isolation** - Dedicated account separate from user accounts provides better security boundaries
* **Granular scopes** - Only the minimum required permissions are requested
* **Audit trail** - Service account activities are logged separately from user activities
## Troubleshooting
### Connection issues
**"Invalid credentials" error**
* Verify the Client ID and Client Secret are correct
* Ensure the credentials haven't been revoked in Atlassian Admin
* Check that the service account still has product access to Confluence
**"Insufficient permissions" error**
* Verify all required scopes are configured (see Step 4)
* Ensure the service account has access to Confluence in Atlassian Admin
* Check that the service account has access to the specific spaces you're trying to sync
**Connection times out**
* Verify your Atlassian organization URL is correct
* Check Atlassian's status page for any ongoing incidents
* Ensure your network allows connections to Atlassian services
### Sync issues
**No spaces visible after connection**
* The service account needs explicit access to spaces
* Contact your Confluence administrator to grant space access to the service account
* Personal spaces may not be accessible to service accounts
**Some pages not syncing**
* Pages with restricted permissions may not be accessible
* Check page-level restrictions in Confluence
* Ensure the service account has at least view access to the pages
**Attachments not syncing**
* Verify the `read:attachment:confluence` scope is configured
* Large attachments may take longer to sync
* Some file types may be excluded from text extraction
### Service account issues
**Cannot create service account**
* Organization admin permissions are required
* Service accounts feature must be enabled for your Atlassian organization
* Check your Atlassian plan supports service accounts
**Cannot add OAuth 2.0 credentials**
* Ensure you're in the correct service account's settings
* OAuth 2.0 credentials require specific Atlassian plans
* Contact Atlassian support if the option is not available
## Support
If you encounter any issues during setup or ongoing operation, please contact Wolfia support at [support@wolfia.com](mailto:support@wolfia.com) with:
* **Integration type** - Confluence Service Account
* **Error messages** - Specific errors from the setup process or sync logs
* **Service account details** - Name and configuration (without secrets)
* **Screenshots** - Setup screens or error dialogs (redact sensitive information)
For assistance with Atlassian service accounts and OAuth configuration, refer to:
* [Atlassian Service Accounts Documentation](https://support.atlassian.com/user-management/docs/manage-your-service-accounts/)
* [Atlassian OAuth 2.0 Documentation](https://developer.atlassian.com/cloud/confluence/oauth-2-3lo-apps/)
The Client Secret is only shown once during creation. Make sure to copy it immediately and store it securely. If you lose it, you'll need to create new credentials.
These scopes provide read-only access to Confluence content. Wolfia does not require write permissions to sync your knowledge base.
### Step 5: Connect to Wolfia
Now we'll configure the integration in Wolfia using your OAuth 2.0 credentials.
1. Log in to your Wolfia account at [https://wolfia.com](https://wolfia.com)
2. Navigate to **Integrations** from the main menu or go directly to [https://wolfia.com/integrations](https://wolfia.com/integrations)
3. In the **Available Integrations** section, find the **Knowledge** category
4. Locate **Confluence (Service Account)** and click **Connect**
5. Enter your OAuth 2.0 credentials:
* **Client ID**: The Client ID from Step 4
* **Client Secret**: The Client Secret from Step 4
* **Atlassian Organization URL**: Your Atlassian URL (e.g., `yourcompany.atlassian.net`)
6. Click **Connect** to authenticate
7. Wolfia will verify the credentials and establish the connection
### Step 6: Select spaces to sync
Choose which Confluence spaces to include in your Wolfia knowledge base.
1. After successful connection, you'll see a list of available Confluence spaces
2. **Toggle spaces**: Enable or disable specific spaces for syncing
* **Enabled spaces** will have their content synced and made available to Wolfia
* **Disabled spaces** will be excluded from syncing
3. Click **Save** to apply your space selection
4. Initial sync will begin automatically for enabled spaces
## What happens after setup
Once configured, Wolfia will:
* **Import existing content** - Sync pages, blog posts, and attachments from enabled Confluence spaces
* **Continuous monitoring** - Automatically detect and sync new or updated content
* **Knowledge enrichment** - Use Confluence content to provide better responses to questionnaires and RFPs
* **Search integration** - Make Confluence content searchable within Wolfia's knowledge base
## Managing the integration
### Viewing sync status
Monitor the health and activity of your Confluence integration:
1. Navigate to **Integrations → Confluence (Service Account)**
2. View integration dashboard showing:
* **Connection status** - Active, paused, or error state
* **Enabled spaces** - Number of spaces currently being synced
* **Last sync time** - When content was last updated
* **Content statistics** - Number of pages and attachments synced
### Adding or removing spaces
Modify which spaces are included in your knowledge base:
1. Go to **Integrations → Confluence (Service Account) → Manage**
2. Toggle spaces on or off as needed
3. Changes take effect immediately and trigger a sync update
### Disconnecting the integration
Remove the integration entirely:
1. Go to **Integrations → Confluence (Service Account)**
2. Click **Disconnect**
3. Confirm the disconnection
4. Optionally, delete the service account in Atlassian Admin if no longer needed
## Security considerations
* **Read-only access** - The integration only requests read permissions; no write access to your Confluence content
* **Service account isolation** - Dedicated account separate from user accounts provides better security boundaries
* **Granular scopes** - Only the minimum required permissions are requested
* **Audit trail** - Service account activities are logged separately from user activities
## Troubleshooting
### Connection issues
**"Invalid credentials" error**
* Verify the Client ID and Client Secret are correct
* Ensure the credentials haven't been revoked in Atlassian Admin
* Check that the service account still has product access to Confluence
**"Insufficient permissions" error**
* Verify all required scopes are configured (see Step 4)
* Ensure the service account has access to Confluence in Atlassian Admin
* Check that the service account has access to the specific spaces you're trying to sync
**Connection times out**
* Verify your Atlassian organization URL is correct
* Check Atlassian's status page for any ongoing incidents
* Ensure your network allows connections to Atlassian services
### Sync issues
**No spaces visible after connection**
* The service account needs explicit access to spaces
* Contact your Confluence administrator to grant space access to the service account
* Personal spaces may not be accessible to service accounts
**Some pages not syncing**
* Pages with restricted permissions may not be accessible
* Check page-level restrictions in Confluence
* Ensure the service account has at least view access to the pages
**Attachments not syncing**
* Verify the `read:attachment:confluence` scope is configured
* Large attachments may take longer to sync
* Some file types may be excluded from text extraction
### Service account issues
**Cannot create service account**
* Organization admin permissions are required
* Service accounts feature must be enabled for your Atlassian organization
* Check your Atlassian plan supports service accounts
**Cannot add OAuth 2.0 credentials**
* Ensure you're in the correct service account's settings
* OAuth 2.0 credentials require specific Atlassian plans
* Contact Atlassian support if the option is not available
## Support
If you encounter any issues during setup or ongoing operation, please contact Wolfia support at [support@wolfia.com](mailto:support@wolfia.com) with:
* **Integration type** - Confluence Service Account
* **Error messages** - Specific errors from the setup process or sync logs
* **Service account details** - Name and configuration (without secrets)
* **Screenshots** - Setup screens or error dialogs (redact sensitive information)
For assistance with Atlassian service accounts and OAuth configuration, refer to:
* [Atlassian Service Accounts Documentation](https://support.atlassian.com/user-management/docs/manage-your-service-accounts/)
* [Atlassian OAuth 2.0 Documentation](https://developer.atlassian.com/cloud/confluence/oauth-2-3lo-apps/)